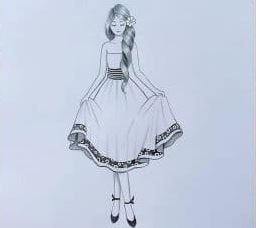
Drawing of A Young Lady With Wonderful Dress. The young lady I drew remains in a high, absolutely adorable lady present with her hands caught despite her excellent faith and her toes turned somewhat internal. To lay a legitimate structure, draw an entire circle for the head, do whatever it takes not to make it excessively little or excessively enormous for easy girl drawing for kids.
Step 1
First, we want to lay out a fundamental shape. The young lady I drew remains in a high, absolutely adorable lady present with her hands caught despite her excellent faith and her toes turned somewhat internal. To lay a legitimate structure, draw an entire circle for the head, do whatever it takes not to make it excessively little or excessively enormous. Keep it similar width as the circles at the shoulders. Draw circles at the shoulders and a line to show the place of the shoulder span, an upward line of the middle, and a topsy turvy bowl with the club feet emerging from that point.
Step 2
To start with, figure out what her head will resemble. Utilize the circle to make your anime jaw and draw some rules for the face. It’s ideal to utilize the bend of the right side (Your right, not hers) of the circle and begin dunking in with the angle and afterward pulling out to make the side of the cheek. It makes the state of your head rather than only a straight line.
Step 3
Utilizing the rules, attract the external piece of the eyes, nose (On the off chance that your nose crosses your headline like mine, you might have to redraw it later), and a grin. Keep the grin somewhat higher than expected as her mouth will be open.
Step 4
Presently, make the circles or irises of the eyes. Make a low plunge bend that contacts the edge of your mouth and attracts a slight slope to the mouth for the grin. Under the lowly bend, attract a slight angle to show the lower lip. Draw some eyelid lines over the eyes.
Step 5
Presently we need to eradicate the circle on her head, so how about we draw the highest point of her bangs and the state of her hair. On top of the charges, there should be a slight bend and victory to show the other accounts being pushed concealed. Haul the hair out of the head.
Step 6
You can now erase your features and rules, which are not generally required. Leave your neck and the rest of your body alone. Attract the other bangs, the clasp, and some medium-length hair.
Step 7
I’ve eased up my aides, so the lines don’t become confounded. As may be obvious, I drew your sleeve, not contacting yet drifting over your rules. Towards the lower part of the sleeves, stick out a bit. Beginning at the lower part of the shoulder circle, draw a bend outward and over the bowl shape to make the midriff and beginning of the dress.
Step 8
Before we proceed, we want to finish the whole chest area. and It took arms cover despite good faith. Draw the neck area and square neck area of the dress. Assuming you’ve seen my chibi sewing instructional exercise, note that I utilize a similar securing method for the neck area, as may be apparent. Garments are not level for her.
Step 9
Before we start on the lower part of the dress, there are a couple of things you want to be familiar with how the creases will function. Notice the blue line that lays out how the folds will go. It is the base piece of the dress and isn’t permitted to be separated. The line should be constant regardless of whether it arrives at a sharp point, no line breaks by any stretch of the imagination, or you will lose the ideal impact. The red lines show how the skin will develop around your connector.
Step 10
The current! Attempt it for training this time. Draw along a designed crease, with a couple of lines coming from the upper marks of the stream to show how the dress folds.
Step 11
Before completing the lower part of the dress, we want to put the legs and feet. Follow your bar rules to make your feet. If you’re struggling, ponder one of those ball-match dolls and how the feet would look and move. I attracted a model close to the leg.
Step 12
Presently you can draw on the base sides of the dress where the texture interfaces and streams behind the legs. It gives your dress profundity and shows that it’s something other than a piece of cardboard taped over. You can finish your drawing by adding adjusted square shapes. To show shoe lines, eyebrows, and, surprisingly, a lovely little cowl on the head.
Step 13
Once done, you can eliminate any lines of guidelines that might, in any case. Be appearing and tidy up whatever. could look jumbled, and you’re finished!
Also read: What size ladder do I need for a 2 story house?